Initial understanding of the resource server in OAuth 2.0
Resource Server is exactly what and how to use few tutorials to talk specifically about this stuff, today we will talk about the concept first, to lay a foundation for subsequent use.
The shortcomings of the traditional security approach
The traditional way to protect an application is to get the credentials (JWT is one of them) given by the server through a username and password (also can be an authentication code), and then carry the credentials to request the interface to get the corresponding resources (Resource). Most of the standalone applications use this model is very convenient and simple.
But once your project gets bigger and needs to be transformed into a microservice, using this approach becomes a bit unwieldy, as each service’s resources need to be authenticated and authorized, so a paradigm is needed to simplify the process.
Authentication and authorization can be loosely coupled
Authentication of users and access control of resources can actually be separated. Let’s say you buy a plane ticket, now you can not only get your ticket from the airline ticketing department, but also from a third party ticketing center offline or online, eventually each flight will verify your ticket to determine if you are eligible for registration and will not care about the channel you purchased your ticket from. This is a real-life example.
If in microservices, each of our services only needs to verify that the request has the permission to access the resource, we can abstract the logic of resource access verification to a common model and implement it with code, very much in line with the idea of decentralization of microservices. This is the fundamental meaning of resource server.
Resource Server
The full name of the resource server is OAuth2 Resource Server, which is actually part of the OAuth 2.0 protocol and is usually implemented with the help of Json Web Token (there is actually another one called Opaque Tokens that can also be used). OAuth 2.0 Authorization Server sends the client a Json Web Token , which is used to verify that the client has permission to access a resource.
When a single application is transformed into a microservice, the authorization service is actually better centralized, unified management of user authentication authorization and issued to the client Token. each specific service is also a resource server, we only need to abstract the access control interface can be. Here follow a principle: common encapsulation into a class library (jar), personalized abstraction for configuration. The general flow chart is as follows.
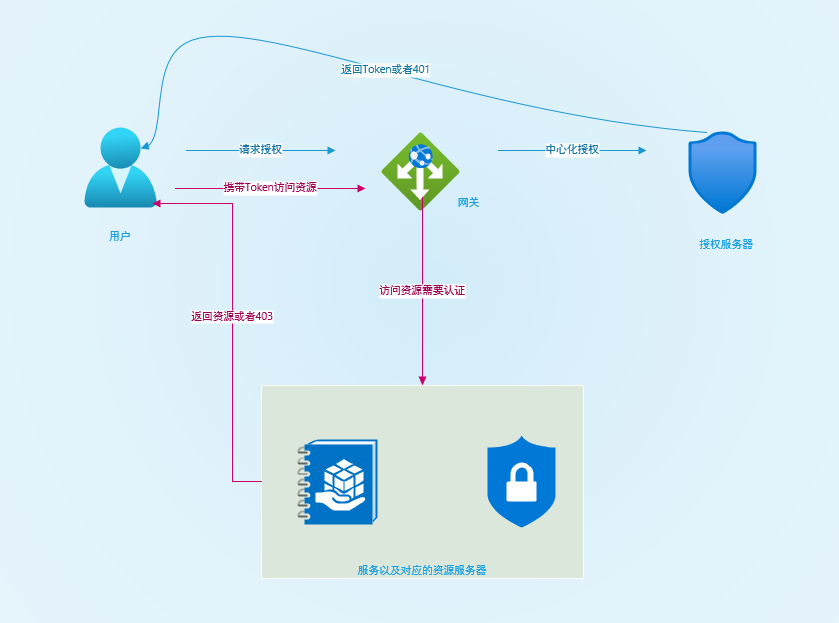
This way the authorization server only cares about issuing Token function, and the resource server is only responsible for verifying Token. Whenever a new service is accessed we only need to add the supporting resource service dependency and configuration, which is very simple to transform.
There is also a way to centralize the resource server on the Internet, which is to centralize the authentication process at the gateway. Personally, I don’t think it is easy to accept unless you have had similar experience, and there are some security context cross-service issues to deal with. The above model is highly recommended for beginners.
I have actually done a preliminary implementation and transformation of the above model, and will then explain how to implement a resource server in microservices using Spring Security, and some of the key points related to transforming microservices in monolithic applications.
Resource server transformation
This DEMO was originally a standalone application, where authentication and authorization were used in one application. After the transformation into a standalone service, the original authentication will be stripped out (more on how to implement this later) and the service will retain only the user credential (JWT) based access control functionality. We will then implement the capability step by step.
Required dependencies
On top of Spring Security, we need to add new dependencies to support OAuth2 Resource Server and JWT. we need to add the following dependency libraries.
|
|
Spring Security 5.x removes the OAuth2.0 authorization server and retains the OAuth2.0 resource server.
JWT decoding
To validate JWT you must implement decoding functionality for JWT, in Spring Security OAuth2 Resource Server module, a decoder is provided by default, this decoder needs to be called based on.
|
|
The metadata under the configuration to generate the decoding configuration, where most of the configuration is to call the well-known endpoint opened by the authorization server, containing a series of parameters to parse and verify the JWT.
jwkSetUriis generally the well-known endpoint provided by the authorization server to obtain the JWK configuration to verify the JWT Token.jwsAlgorithmSpecifies the algorithm used by jwt, default RSA-256 .issuerUriEndpoint for getting OAuth2.0 authorization server metadata.publicKeyLocationThe path to the public key used for decoding, as the resource server will only hold the public key and should not hold the private key.
In order to achieve a smooth transition, the default configuration will definitely not work, and a JWT decoder needs to be customized. Let’s implement it step by step next.
Separate public and private keys
The resource server can only hold the public key, so it needs to export a public key from the previous jks file.
|
|
For example.
|
|
Put the separated cer public key file under the path of the original jks file, and the resource server no longer keeps jks.
Custom jwt decoder
spring-security-oauth2-jose is the jose specification dependency of Spring Security. I will implement a custom JWT decoder based on this class library.
|
|
The above decoder is based on our public key certificate, and I also customized some checksum policies. I have to say that Nimbus’ jwt class library is much better than jjwt.
Custom resource server configuration
Next, configure the resource server.
Core processes and concepts
The resource server is actually configured with a filter BearerTokenAuthenticationFilter to intercept and authenticate Bearer Token, allowing the request if the authentication passes and the permission meets the requirements, and denying the request if it does not.
The difference is that after successful authentication, the credentials are no longer UsernamePasswordAuthenticationToken but JwtAuthenticationToken.
|
|
Special care should be taken when making changes, especially when user credential information is obtained from SecurityContext.
Resource manager configuration
Starting from a certain version of Spring Security 5 there is no need to integrate adapter classes anymore, you can configure Spring Security just like this, and the same for the resource manager.
|
|
Here you just need to declare the resource server that uses JWT checksum, and configure the defined 401 endpoint and 403 processor. Here I added SpEL-based dynamic permission control, which has been covered in the past, so I won’t go over it here.
JWT personalization parsing
Parsing data from JWT Token and generating JwtAuthenticationToken is done by JwtAuthenticationConverter. You can customize this converter to implement some personalized features. For example, if by default the parsed permissions are prefixed with SCOPE_ and the project uses ROLE_, you can use this class to be compatible with the old project.
|
|
Here the transformation is basically complete. Your protected resource API will be protected by Bearer Token.
In practice, it is recommended to wrap the resource server as a dependency and integrate it into the service that needs to protect the resource.
Additional Notes
To test the resource server, assume we have an authorization server that issues tokens. Here we simply simulate a token issuing method to obtain a token:
|
|
Reference