When we talk about RPC (Remote Procedure Call Protocol), what pops into your mind is probably RESTful API, Dubbo, WebService, Java RMI, CORBA and so on.

In fact, RabbitMQ also provides us with RPC function, and it is very easy to use.

Today I’ll share with you a simple case of how to implement a simple RPC call with Spring Boot+RabbitMQ.

Some readers may have misunderstandings about RabbitMQ’s implementation of RPC calls and think that it is too simple. First, the client sends a message to queue_1, the server listens to the message on queue_1 and processes it after receiving it; after processing, the server sends a message to queue_2, then the client listens to the message on queue_2 and knows the result of the server’s processing.

This approach is not impossible, but it is a bit cumbersome, and RabbitMQ provides a ready-made solution that can be used directly, which is very convenient. Next, let’s learn together.

1. Architecture

Let’s start with a simple architecture diagram.

rabbit mq

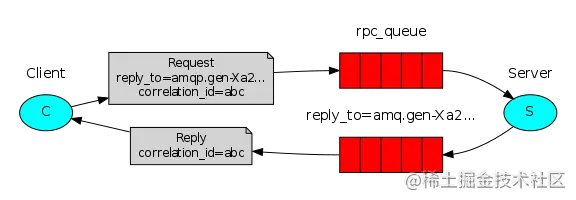
This diagram makes the problem very clear:

  1. first Client sends a message, compared with an ordinary message, this message has two more key contents: one is correlation_id, which indicates the unique id of this message, and another content is reply_to, which indicates the name of the message reply queue.
  2. Server gets the message from the message sending queue and processes the corresponding business logic, then sends the processing result to the callback queue specified by reply_to.
  3. Client reads the message from the callback queue and can know what the execution of the message is like.

2. Practice

Next we’ll see how this plays out with a concrete example.

2.1 Client development

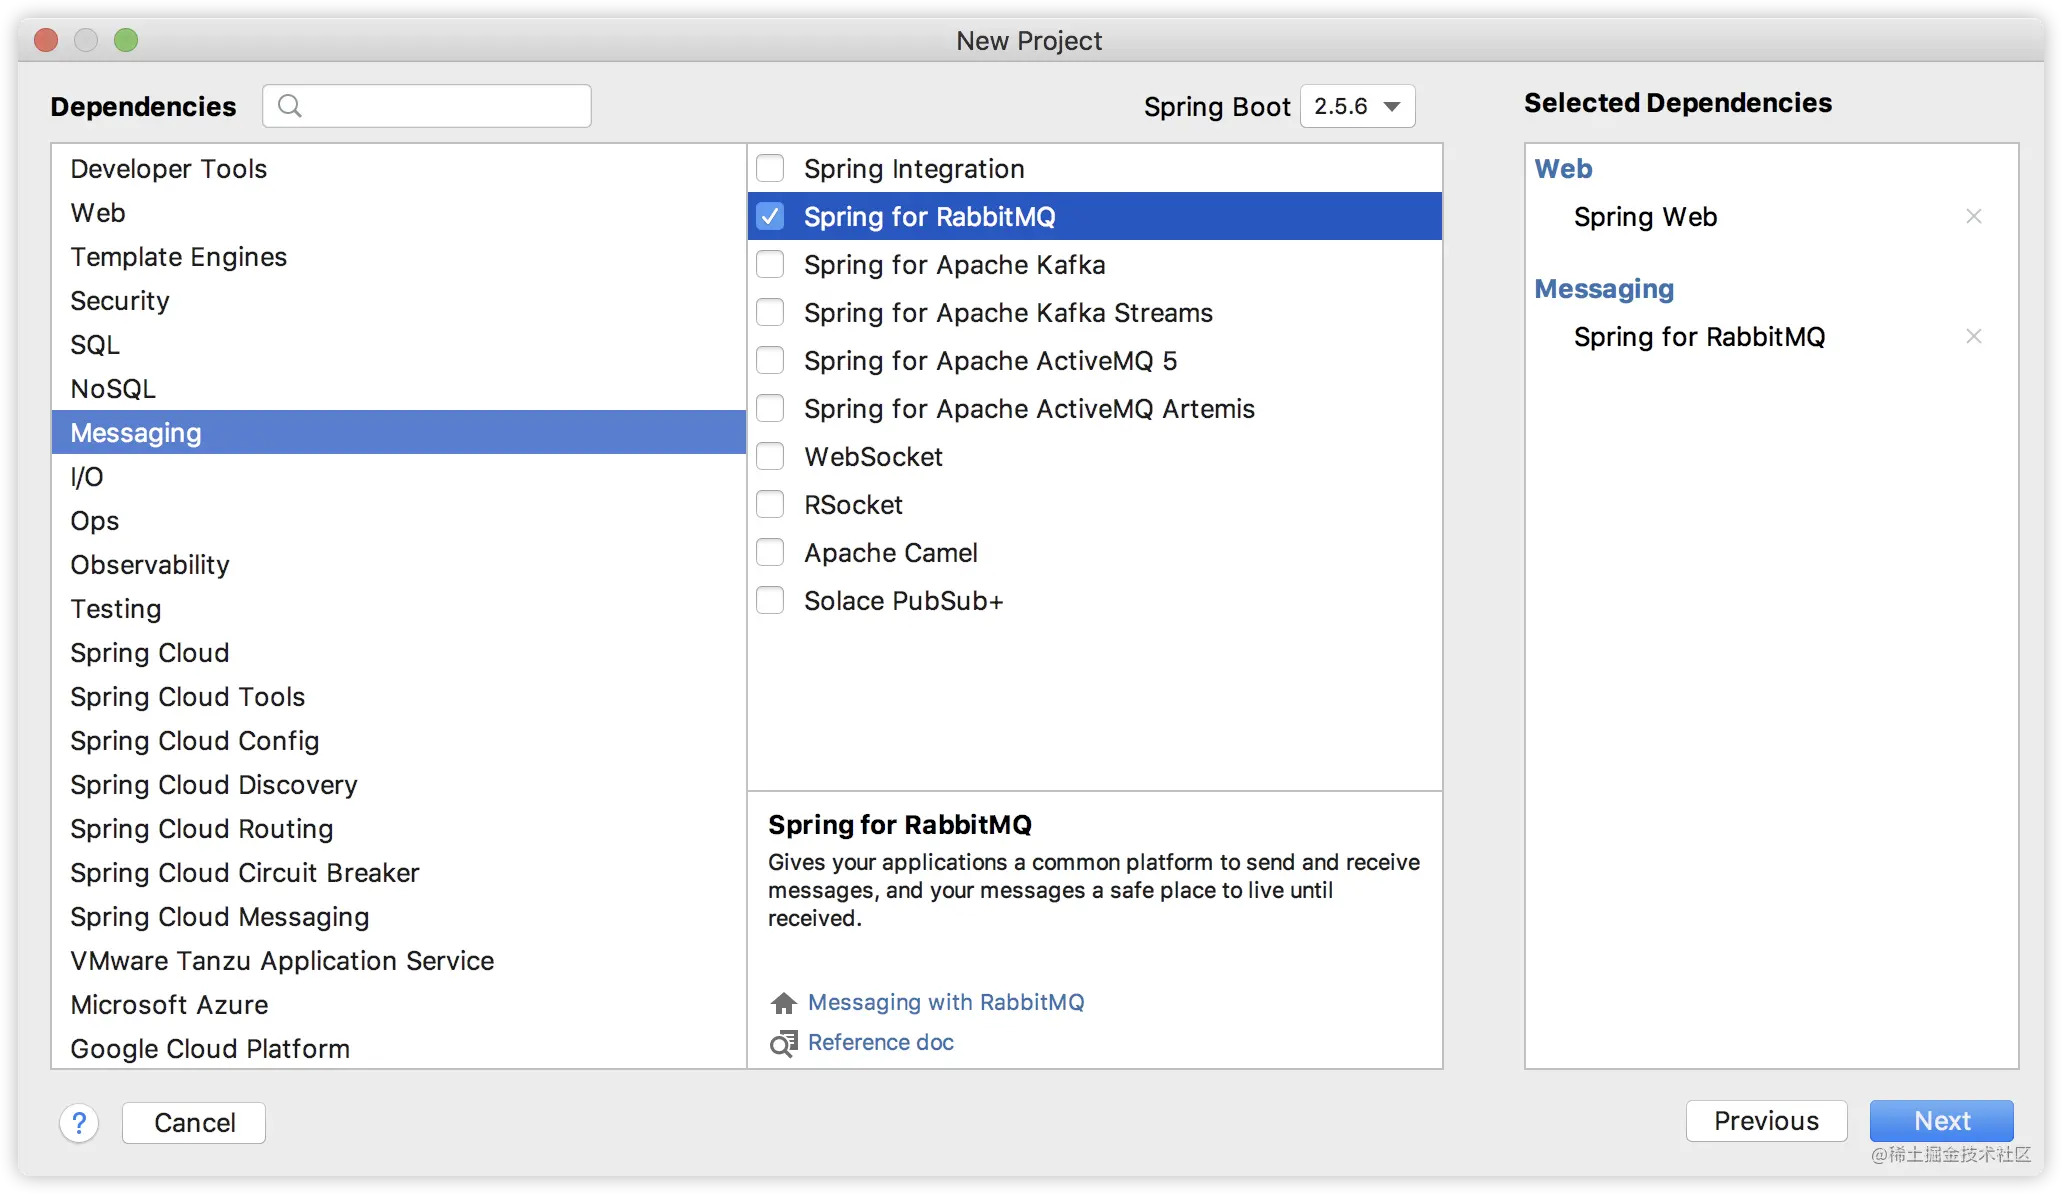
First let’s create a Spring Boot project named producer as a message producer, and add web and rabbitmq dependencies when creating it, as follows.

spring rabbit mq

After the project is successfully created, first configure the basic RabbitMQ information in application.properties, as follows

1
2
3
4
5
6
spring.rabbitmq.host=localhost
spring.rabbitmq.port=5672
spring.rabbitmq.username=guest
spring.rabbitmq.password=guest
spring.rabbitmq.publisher-confirm-type=correlated
spring.rabbitmq.publisher-returns=true

The first four lines of this configuration are well understood, I will not repeat, the next two lines: the first is to configure the message confirmation method, we confirm by correlated, only if this configuration is turned on, the future message will be with correlation_id, only through the correlation_id we can correlate between the sent message and the return value. The last line of the configuration is to enable the return of failure to send.

Next we will provide a configuration class as follows.

 1
 2
 3
 4
 5
 6
 7
 8
 9
10
11
12
13
14
15
16
17
18
19
20
21
22
23
24
25
26
27
28
29
30
31
32
33
34
35
36
37
38
39
40
41
42
43
44
45
46
47
48
49
50
51
52
53
54
55
56
57
58
59
60
61
62
63
64
65
66
67
68
69
70
71
72
73
74
75
76
77
78
79
80
81
82
/**
 * @author 江南一点雨
 * @微信公众号 江南一点雨
 * @网站 http://www.itboyhub.com
 * @国际站 http://www.javaboy.org
 * @微信 a_java_boy
 * @GitHub https://github.com/lenve
 * @Gitee https://gitee.com/lenve
 */
@Configuration
public class RabbitConfig {

    public static final String RPC_QUEUE1 = "queue_1";
    public static final String RPC_QUEUE2 = "queue_2";
    public static final String RPC_EXCHANGE = "rpc_exchange";

    /**
     * 设置消息发送RPC队列
     */
    @Bean
    Queue msgQueue() {
        return new Queue(RPC_QUEUE1);
    }

    /**
     * 设置返回队列
     */
    @Bean
    Queue replyQueue() {
        return new Queue(RPC_QUEUE2);
    }

    /**
     * 设置交换机
     */
    @Bean
    TopicExchange exchange() {
        return new TopicExchange(RPC_EXCHANGE);
    }

    /**
     * 请求队列和交换器绑定
     */
    @Bean
    Binding msgBinding() {
        return BindingBuilder.bind(msgQueue()).to(exchange()).with(RPC_QUEUE1);
    }

    /**
     * 返回队列和交换器绑定
     */
    @Bean
    Binding replyBinding() {
        return BindingBuilder.bind(replyQueue()).to(exchange()).with(RPC_QUEUE2);
    }


    /**
     * 使用 RabbitTemplate发送和接收消息
     * 并设置回调队列地址
     */
    @Bean
    RabbitTemplate rabbitTemplate(ConnectionFactory connectionFactory) {
        RabbitTemplate template = new RabbitTemplate(connectionFactory);
        template.setReplyAddress(RPC_QUEUE2);
        template.setReplyTimeout(6000);
        return template;
    }


    /**
     * 给返回队列设置监听器
     */
    @Bean
    SimpleMessageListenerContainer replyContainer(ConnectionFactory connectionFactory) {
        SimpleMessageListenerContainer container = new SimpleMessageListenerContainer();
        container.setConnectionFactory(connectionFactory);
        container.setQueueNames(RPC_QUEUE2);
        container.setMessageListener(rabbitTemplate(connectionFactory));
        return container;
    }
}

In this configuration class, we configure the message sending queue msgQueue and the message return queue replyQueue, and then bind these two queues to the message switch. This is a regular RabbitMQ operation, nothing to say.

The tool we use for sending messages in Spring Boot is RabbitTemplate, which is automatically provided by default, but we need to re-customize it here, mainly to add a return queue for sending messages, and finally we need to set a listener for the return queue.

Okay, then we can start the specific message sending.

 1
 2
 3
 4
 5
 6
 7
 8
 9
10
11
12
13
14
15
16
17
18
19
20
21
22
23
24
25
26
27
28
29
30
31
32
33
34
35
36
37
38
39
40
41
42
43
44
45
46
47
/**
 * @author 江南一点雨
 * @微信公众号 江南一点雨
 * @网站 http://www.itboyhub.com
 * @国际站 http://www.javaboy.org
 * @微信 a_java_boy
 * @GitHub https://github.com/lenve
 * @Gitee https://gitee.com/lenve
 */
@RestController
public class RpcClientController {

    private static final Logger logger = LoggerFactory.getLogger(RpcClientController.class);

    @Autowired
    private RabbitTemplate rabbitTemplate;

    @GetMapping("/send")
    public String send(String message) {
        // 创建消息对象
        Message newMessage = MessageBuilder.withBody(message.getBytes()).build();

        logger.info("client send:{}", newMessage);

        //客户端发送消息
        Message result = rabbitTemplate.sendAndReceive(RabbitConfig.RPC_EXCHANGE, RabbitConfig.RPC_QUEUE1, newMessage);

        String response = "";
        if (result != null) {
            // 获取已发送的消息的 correlationId
            String correlationId = newMessage.getMessageProperties().getCorrelationId();
            logger.info("correlationId:{}", correlationId);

            // 获取响应头信息
            HashMap<String, Object> headers = (HashMap<String, Object>) result.getMessageProperties().getHeaders();

            // 获取 server 返回的消息 id
            String msgId = (String) headers.get("spring_returned_message_correlation");

            if (msgId.equals(correlationId)) {
                response = new String(result.getBody());
                logger.info("client receive:{}", response);
            }
        }
        return response;
    }
}

This piece of code is actually some conventional code, I pick a few key nodes to explain.

  • The message is sent by calling the sendAndReceive method, which comes with a return value, and the return value is the message returned by the server.

  • The message returned by the server contains the spring_returned_message_correlation field in the header, which is the correlation_id when the message is sent. message_correlation field in the return message header, we can bind the content of the returned message to the sent message and confirm that the returned content is for the sent message.

This is the entire client-side development, in fact, the most central is the sendAndReceive method call. Although the call is simple, but the preparation work should be done enough. For example, if we don’t configure correlated in application.properties, there will be no correlation_id in the sent message, so we won’t be able to correlate the content of the returned message with the content of the sent message.

2.2 Server-side development

Let’s take a look at the server-side development.

First create a Spring Boot project called consumer. The dependencies added to the project are the same as the dependencies created for client-side development, so we won’t go over them again.

Then you configure the application.properties configuration file, which is the same as the client-side configuration, so you don’t need to repeat it.

Next, provide a RabbitMQ configuration class, this configuration class is relatively simple, simply configure the message queue and bind it to the message switch, as follows.

 1
 2
 3
 4
 5
 6
 7
 8
 9
10
11
12
13
14
15
16
17
18
19
20
21
22
23
24
25
26
27
28
29
30
31
32
33
34
35
36
37
38
39
40
41
42
43
44
45
46
47
48
49
50
51
52
53
54
55
56
/**
 * @author 江南一点雨
 * @微信公众号 江南一点雨
 * @网站 http://www.itboyhub.com
 * @国际站 http://www.javaboy.org
 * @微信 a_java_boy
 * @GitHub https://github.com/lenve
 * @Gitee https://gitee.com/lenve
 */
@Configuration
public class RabbitConfig {

    public static final String RPC_QUEUE1 = "queue_1";
    public static final String RPC_QUEUE2 = "queue_2";
    public static final String RPC_EXCHANGE = "rpc_exchange";

    /**
     * 配置消息发送队列
     */
    @Bean
    Queue msgQueue() {
        return new Queue(RPC_QUEUE1);
    }

    /**
     * 设置返回队列
     */
    @Bean
    Queue replyQueue() {
        return new Queue(RPC_QUEUE2);
    }

    /**
     * 设置交换机
     */
    @Bean
    TopicExchange exchange() {
        return new TopicExchange(RPC_EXCHANGE);
    }

    /**
     * 请求队列和交换器绑定
     */
    @Bean
    Binding msgBinding() {
        return BindingBuilder.bind(msgQueue()).to(exchange()).with(RPC_QUEUE1);
    }

    /**
     * 返回队列和交换器绑定
     */
    @Bean
    Binding replyBinding() {
        return BindingBuilder.bind(replyQueue()).to(exchange()).with(RPC_QUEUE2);
    }
}

Finally, let’s look at the consumption of the message.

 1
 2
 3
 4
 5
 6
 7
 8
 9
10
11
12
13
14
@Component
public class RpcServerController {
    private static final Logger logger = LoggerFactory.getLogger(RpcServerController.class);
    @Autowired
    private RabbitTemplate rabbitTemplate;

    @RabbitListener(queues = RabbitConfig.RPC_QUEUE1)
    public void process(Message msg) {
        logger.info("server receive : {}",msg.toString());
        Message response = MessageBuilder.withBody(("i'm receive:"+new String(msg.getBody())).getBytes()).build();
        CorrelationData correlationData = new CorrelationData(msg.getMessageProperties().getCorrelationId());
        rabbitTemplate.sendAndReceive(RabbitConfig.RPC_EXCHANGE, RabbitConfig.RPC_QUEUE2, response, correlationData);
    }
}

The logic here is relatively simple.

  1. the server first receives the message and prints it out.
  2. The server extracts the correlation_id from the original message.
  3. The server calls the sendAndReceive method to send the message to the RPC_QUEUE2 queue with the correlation_id parameter.

After the server-side message is sent, the client will receive the result back from the server.

OK, the job is done.

2.3 Testing

Next, we perform a simple test.

First, start RabbitMQ.

Next, start the producer and consumer separately, and then call the producer interface in postman to test it as follows.

postman

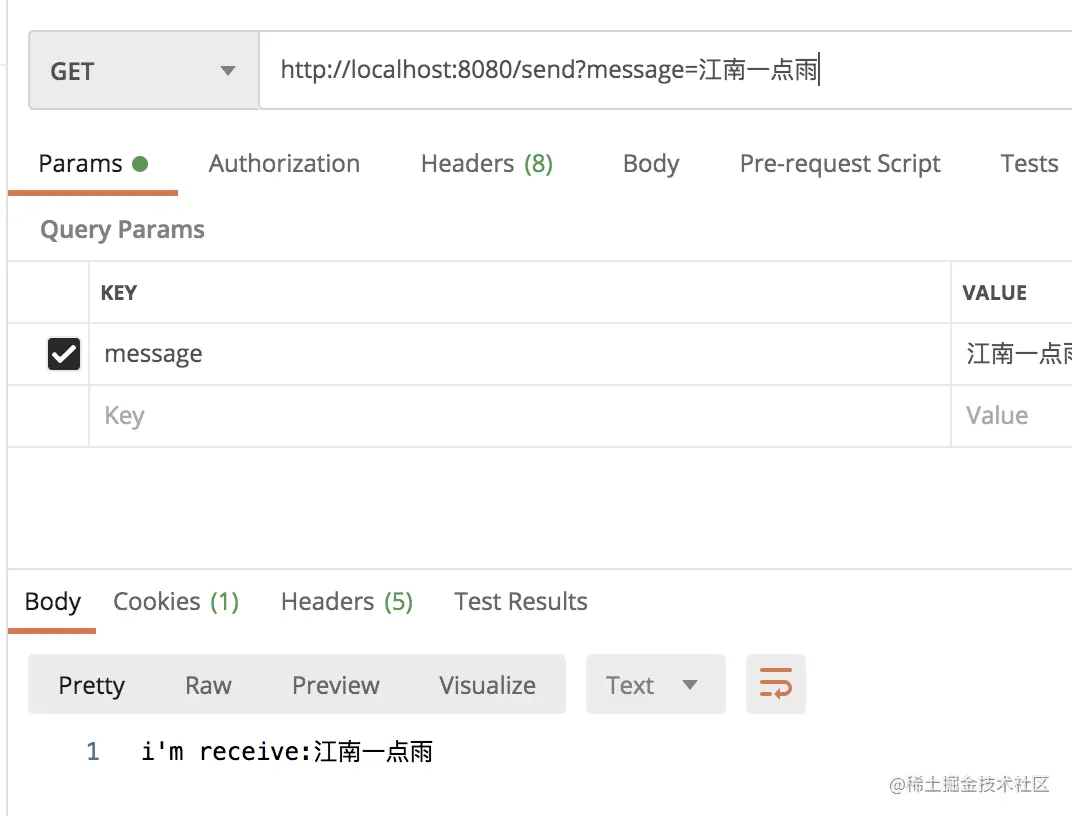
As you can see, the return message from the server has been received.

Take a look at the producer’s runtime log.

log

As you can see, the message is sent out and the information returned by the consumer is also received.

log

As you can see, the consumer also receives the message from the client.

Reference https://juejin.cn/post/7031020144339976205