Keycloak provides adapters for popular Java applications. In previous articles, we demonstrated security protection for Spring Boot using one of the adapters. Keycloak also provides adapters for Spring Security, and in the following articles we will learn together about the use of Spring Security adapters.
The installation of Keycloak can be found in the previous tutorials in the series.
Adapter integration
In our Spring application we integrate keycloak-spring-security-adapter.
1
2
3
4
5
|
<dependency>
    <groupId>org.keycloak</groupId>
    <artifactId>keycloak-spring-security-adapter</artifactId>
    <version>15.0.0</version>
</dependency>
|
Integration in Spring Boot can be done like this.
1
2
3
4
5
6
7
8
9
|
<dependency>
    <groupId>org.springframework.boot</groupId>
    <artifactId>spring-boot-starter-security</artifactId>
</dependency>
<dependency>
    <groupId>org.keycloak</groupId>
    <artifactId>keycloak-spring-boot-starter</artifactId>
    <version>15.0.0</version>
</dependency>
|
It is then possible to integrate Keycloak using the Spring Security feature. Keycloak provides a KeycloakWebSecurityConfigurerAdapter as a convenient base class for creating WebSecurityConfigurer instances. We can write a configuration class to customize our security policy, like this.
 1
 2
 3
 4
 5
 6
 7
 8
 9
10
11
12
13
14
15
16
17
18
19
20
21
22
23
24
25
26
27
28
29
30
31
32
33
34
|
@KeycloakConfiguration
public class SecurityConfig extends KeycloakWebSecurityConfigurerAdapter
{
    /**
     *  注册了一个Keycloak的AuthenticationProvider
     */
    @Autowired
    public void configureGlobal(AuthenticationManagerBuilder auth) throws Exception {
        auth.authenticationProvider(keycloakAuthenticationProvider());
    }

    /**
     * 定义会话策略
     */
    @Bean
    @Override
    protected SessionAuthenticationStrategy sessionAuthenticationStrategy() {
        return new RegisterSessionAuthenticationStrategy(new SessionRegistryImpl());
    }

    /**
     * 常见的Spring Security安全策略
     */
    @Override
    protected void configure(HttpSecurity http) throws Exception
    {
        super.configure(http);
        http
                .authorizeRequests()
                .antMatchers("/customers*").hasRole("USER")
                .antMatchers("/admin/**").hasRole("base_user")
                .anyRequest().permitAll();
    }
}
|
Note: The above configuration does not work.
After configuring the above then we launch the application directly and the result is not as expected.
1
|
java.io.FileNotFoundException: Unable to locate Keycloak configuration file: keycloak.json
|
Throws an exception that the keycloak.json file could not be found. Each of the Java adapters supported by Keycloak can be configured with a simple JSON file, which is what we are missing.
 1
 2
 3
 4
 5
 6
 7
 8
 9
10
11
12
13
14
15
16
17
18
19
20
21
22
23
24
25
26
27
28
29
30
31
32
33
34
35
36
37
|
{
  "realm" : "demo",
  "resource" : "customer-portal",
  "realm-public-key" : "MIGfMA0GCSqGSIb3D...31LwIDAQAB",
  "auth-server-url" : "https://localhost:8443/auth",
  "ssl-required" : "external",
  "use-resource-role-mappings" : false,
  "enable-cors" : true,
  "cors-max-age" : 1000,
  "cors-allowed-methods" : "POST, PUT, DELETE, GET",
  "cors-exposed-headers" : "WWW-Authenticate, My-custom-exposed-Header",
  "bearer-only" : false,
  "enable-basic-auth" : false,
  "expose-token" : true,
  "verify-token-audience" : true,
   "credentials" : {
      "secret" : "234234-234234-234234"
   },

   "connection-pool-size" : 20,
   "socket-timeout-millis": 5000,
   "connection-timeout-millis": 6000,
   "connection-ttl-millis": 500,
   "disable-trust-manager": false,
   "allow-any-hostname" : false,
   "truststore" : "path/to/truststore.jks",
   "truststore-password" : "geheim",
   "client-keystore" : "path/to/client-keystore.jks",
   "client-keystore-password" : "geheim",
   "client-key-password" : "geheim",
   "token-minimum-time-to-live" : 10,
   "min-time-between-jwks-requests" : 10,
   "public-key-cache-ttl": 86400,
   "redirect-rewrite-rules" : {
   "^/wsmaster/api/(.*)$" : "/api/$1"
   }
}
|
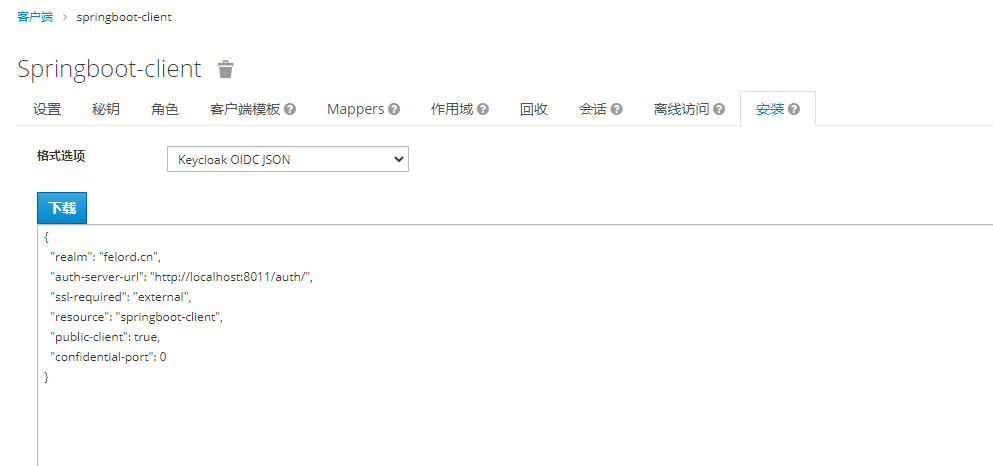
The client configuration properties included above can all be configured in the Keycloak console, see the following figure.
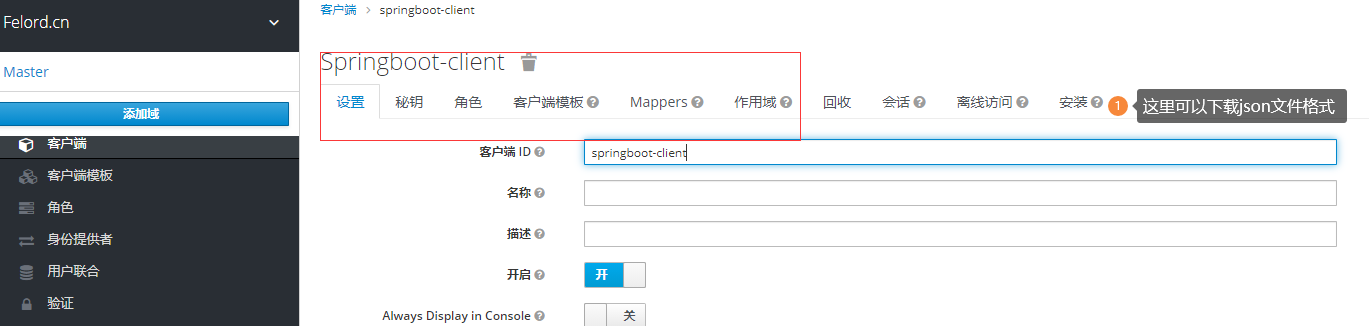
This means that the json file we need corresponds to the configuration items in the diagram. It is more user-friendly that we don’t need to write this json file ourselves, Keycloak provides a way to download the client configuration, here I only use the necessary configuration items.
Introducing client-side configuration
Although I got the json file without any problems, loading the json configuration was not so smooth, after some fiddling I needed to implement a KeycloakConfigResolver and inject Spring IoC with the following two implementations.
reuse the Spring Boot Adapter configuration
To directly reuse the Spring Boot configuration form, first declare the KeycloakConfigResolver implementation of Spring Boot.
1
2
3
4
5
6
7
8
9
|
  /**
     * 复用spring boot 的方法
     *
     * @return the keycloak config resolver
     */
    @Bean
    public KeycloakConfigResolver keycloakConfigResolver() {
        return new KeycloakSpringBootConfigResolver();
    }
|
Then reuse the configuration items in Spring Boot’s application.yaml.
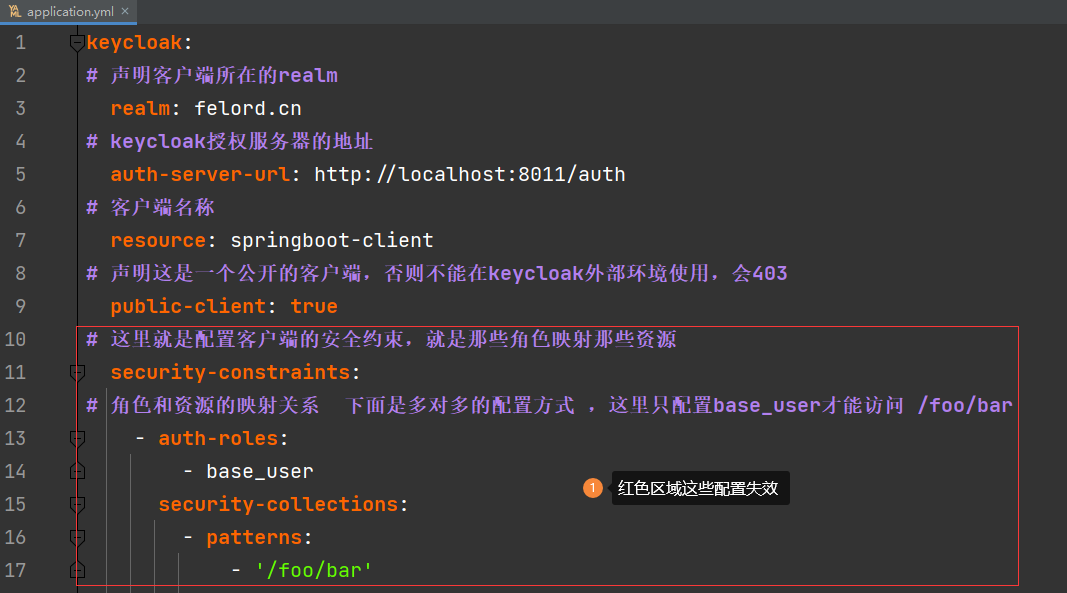
The original role resource mapping constraint is invalidated.
Custom implementation
You can also write custom parses, at which point the json form is irrelevant and you can store the contents of the json file anywhere you like.
 1
 2
 3
 4
 5
 6
 7
 8
 9
10
11
12
13
14
15
16
17
18
19
|
/**
 * 自己写解析
 *
 * @return the keycloak config resolver
 */
@Bean
public KeycloakConfigResolver fileKeycloakConfigResolver() {
    return  new KeycloakConfigResolver() {
        @SneakyThrows
        @Override
        public KeycloakDeployment resolve(HttpFacade.Request request) {
            // json 文件放到resources 文件夹下
            ClassPathResource classPathResource = new ClassPathResource("./keycloak.json");
            AdapterConfig adapterConfig = new ObjectMapper().readValue(classPathResource.getFile(), AdapterConfig.class);

            return KeycloakDeploymentBuilder.build(adapterConfig);
        }
    };
}
|
Role Naming Policy
Spring Security adds a ROLE_ prefix to each role, which requires us to declare a GrantedAuthoritiesMapper implementation of SimpleAuthorityMapper to do this. In Keycloak it is configured in KeycloakAuthenticationProvider.
1
2
|
KeycloakAuthenticationProvider authenticationProvider = keycloakAuthenticationProvider();
authenticationProvider.setGrantedAuthoritiesMapper(new SimpleAuthorityMapper());
|
Complete configuration
applicaiton.yaml :
1
2
3
4
5
6
7
8
9
|
keycloak:
  # 声明客户端所在的realm
  realm: felord.cn
  # keycloak授权服务器的地址
  auth-server-url: http://localhost:8011/auth
  # 客户端名称
  resource: springboot-client
  # 声明这是一个公开的客户端,否则不能在keycloak外部环境使用,会403
  public-client: true
|
Here you have to combine the configuration with the json file exported by Keycloak.
Spring Security Configuration.
 1
 2
 3
 4
 5
 6
 7
 8
 9
10
11
12
13
14
15
16
17
18
19
20
21
22
23
24
25
26
27
28
29
30
31
32
33
34
35
36
37
38
39
40
41
42
43
44
45
46
47
48
49
50
51
52
53
54
55
56
57
|
@KeycloakConfigurationpublic
class SecurityConfig extends KeycloakWebSecurityConfigurerAdapter {

	/** * 复用spring boot 的方法 * * @return the keycloak config resolver */
	@Bean
	public KeycloakConfigResolver keycloakConfigResolver() {
		return new KeycloakSpringBootConfigResolver();
	}

	/** * 自己写解析 * * @return the keycloak config resolver *///
	@Bean
	public KeycloakConfigResolver fileKeycloakConfigResolver() {
		return request -> { // json 文件放到resources 文件夹下
			ClassPathResource classPathResource = new ClassPathResource("./keycloak.json");
			AdapterConfig adapterConfig = null;
			try {
				adapterConfig = new ObjectMapper().readValue(classPathResource.getFile(), AdapterConfig.class);
			} catch (IOException e) {
				e.printStackTrace();
			}
			return KeycloakDeploymentBuilder.build(adapterConfig);
		};
	}

	/**
	 * * 配置{@link AuthenticationManager} *
	 * 这里会引入Keycloak的{@link AuthenticationProvider}实现 * * @param auth the auth
	 */
	@Autowired
	public void configureGlobal(AuthenticationManagerBuilder auth) {
		KeycloakAuthenticationProvider authenticationProvider = keycloakAuthenticationProvider();
		authenticationProvider.setGrantedAuthoritiesMapper(new SimpleAuthorityMapper());
		auth.authenticationProvider(authenticationProvider);
	}

	/** * 会话身份验证策略 */
	@Bean
	@Override
	protected SessionAuthenticationStrategy sessionAuthenticationStrategy() {
		return new RegisterSessionAuthenticationStrategy(new SessionRegistryImpl());
	}

	/**
	 * * 配置 session 监听器 保证单点退出生效 * * @return the servlet listener registration bean
	 */
	@Bean
	public ServletListenerRegistrationBean<HttpSessionEventPublisher> httpSessionEventPublisher() {
		return new ServletListenerRegistrationBean<>(new HttpSessionEventPublisher());
	}

	@Override
	protected void configure(HttpSecurity http) throws Exception {
		super.configure(http);
		http.authorizeRequests().antMatchers("/customers*").hasRole("USER").antMatchers("/admin/**")
				.hasRole("base_user").anyRequest().permitAll();
	}
}
|
Call Flow
The resource client springboot-client has an interface /admin/foo which is forwarded to the following address when not logged in:
1
|
http://localhost:8011/auth/realms/felord.cn/protocol/openid-connect/auth?response_type=code&client_id=springboot-client&redirect_uri=http%3A%2F%2Flocalhost%3A8080%2Fsso%2Flogin&state=ec00d608-5ce7-47a0-acc8-8a20a2bfadfd&login=true&scope=openid
|
Enter the correct user password to get the desired result.
Typical authorazation code flow.
Summary
The main points of Keycloak integration with Spring Security need to be sorted out again here. In the native case, client-side configuration, user information, and role information are all handled by Keycloak; the client is only responsible for the role and resource mapping relationships. Later we will go deeper and customize Keycloak and Spring Security to meet the needs of real world scenarios.
Reference https://felord.cn/keycloak3.html