Introduction
In this blog post we are going to look at how we can implement pagination with hateoas while supporting filtering and sorting in a spring boot application. We will first start off implementing filtering, and then iteratively page, sorting and finally pagination wtih Hateoas.
Tech Stack
Below are the list of languages, frameworks and libraries used in this tutorial
- Java 11
- Maven
- h2 in memory database
- REST apis
- SpringBoot 2.6.6
- Spring Data jpa
- Hateoas
Usecase for Hateoas with pagination and filterin/sorting
When fetching data from a table you probably implement your response object as a List<Object> . This works perfectly fine if it is a small data set.
When you have a data set that is ’large’, you do not want to send the data to the client all at once. Imagine you have 100k rows in your table and each row has 10 columns. If the user is only vieweing maybe 50 rows in the UI(our client) at a specific time, why send 100k rows?
Unless it a specific export functionality, you shouldn’t send back all the data to the user. Instead you should send a subset of the data only.
At the same time, we do not want to restrict the user from seeing all the data. If the user wants to add a filter or sort some data out of these 100k rows, he should be able to do it.
From a front end perspective, if the user clicks on the next page, they will do another call to the backend to get the next set of data.
This is where Pagination + Filtering + Sorting becomes very very helpful.
Hateoas also provides links to other pages which is extremely helpful as we will see.
What will our end result look like
Before we get into the details, take a look at our request URL and the Response format we finally end up with. We will create a long url because we are allowing a high level of customization.
Request URL: http://localhost:8080/api/v4/customers?firstNameFilter=R&lastNameFilter=S&page=0&size=10&sortList=firstName&sortOrder=ASC
Response:
 1
 2
 3
 4
 5
 6
 7
 8
 9
10
11
12
13
14
15
16
17
18
19
20
21
22
23
24
25
26
27
28
29
30
31
32
33
34
35
36
37
38
39
40
41
42
43
44
|
{
   "_embedded": {
      "customerModelList": [
         {
         "id": 971,
         "customerId": "de6b8664-ba90-41fc-a9f4-da7d0b89c106",
         "firstName": "Rabi",
         "lastName": "Dufour"
         },
         {
         "id": 339,
         "customerId": "44b5c01d-c379-4f66-b8ed-0fda4837db4e",
         "firstName": "Rachelle",
         "lastName": "Fleischer"
         },
         {
         "id": 838,
         "customerId": "443b06fd-7160-4234-9102-93afb0f6d9ad",
         "firstName": "Rafaelia",
         "lastName": "Bladen"
         }
      ]
   },
   "_links": {
      "first": {
         "href": "http://localhost:8080/api/v4/customers?firstNameFilter=R&sortList=firstName&sortOrder=ASC&page=0&size=3&sort=firstName,asc"
      },
      "self": {
         "href": "http://localhost:8080/api/v4/customers?firstNameFilter=R&sortList=firstName&sortOrder=ASC&page=0&size=3&sort=firstName,asc"
      },
      "next": {
        "href": "http://localhost:8080/api/v4/customers?firstNameFilter=R&sortList=firstName&sortOrder=ASC&page=1&size=3&sort=firstName,asc"
      },
      "last": {
        "href": "http://localhost:8080/api/v4/customers?firstNameFilter=R&sortList=firstName&sortOrder=ASC&page=19&size=3&sort=firstName,asc"
      }
   },
   "page": {
      "size": 3,
      "totalElements": 60,
      "totalPages": 20,
      "number": 0
   }
}
|
As you can see in this case, the endpoint provides you links on how you can access the other data. It also tells you how much data is there, how many pages and the elements per page and more. This is extremely helpful for any client accessing our API to traverse through the data.
Create a Base spring boot app
First before we get to the actual code, let’s walk through our base code and set up a simple controller, service, entity and repository. Something you’d do for any spring boot application. Then let’s also set up the Database and insert some data.
NOTE: Skip this section if you just need to see how the implementation is done. This is only for anyone following along.
Create base app
You can create the base application by using the start.spring.io website.
Enter your app details and add the below dependencies
- Spring Web
- Spring Data JPA
- H2 Database
- Spring HATEOAS
- This will auto create your pom.xml and project folders
Create Entity and Repository
We will be creating 1 Entity-customer with 4 fields - id(sequence generated), customerId(unique string), first name and last name. We will also keep getters and setters for encapsulation
 1
 2
 3
 4
 5
 6
 7
 8
 9
10
11
12
13
14
15
16
17
18
19
20
21
22
23
24
25
26
27
28
29
30
31
32
33
34
35
36
37
38
|
@Entity
@Table(name="customer")
public class Customer {
    @Id
    @GeneratedValue
    private Long id;
    @Column(nullable = false, unique = true)
    private String customerId;
    @Column(nullable = false, length = 50)
    private String firstName;
    @Column(nullable = false, length = 50)
    private String lastName;

    public Long getId() {
        return id;
    }
    public void setId(Long id) {
        this.id = id;
    }
    public String getCustomerId() {
        return customerId;
    }
    public void setCustomerId(String customerId) {
        this.customerId = customerId;
    }
    public String getFirstName() {
        return firstName;
    }
    public void setFirstName(String firstName) {
        this.firstName = firstName;
    }
    public String getLastName() {
        return lastName;
    }
    public void setLastName(String lastName) {
        this.lastName = lastName;
    }
}
|
Create a repoistory interface for the entity. We will update this later.
1
2
|
@Repository
public interface CustomerRepository extends JpaRepository<Customer, Long> {}
|
Create Service
Now create a simple service file to fetch the data
 1
 2
 3
 4
 5
 6
 7
 8
 9
10
|
@Service
public class CustomerService {
    @Autowired
    private CustomerRepository customerRepository;

    public List<Customer> fetchCustomerDataAsList() {
        // Fetch all customers using findAll
        return customerRepository.findAll();
    }
}
|
Create Controller
Now lets create a basic controller with a GET request that calls the service method
 1
 2
 3
 4
 5
 6
 7
 8
 9
10
11
12
|
@RestController
public class CustomerController {
    @Autowired
    private CustomerService customerService;
    /**
     * @return List of all customers
     */
    @GetMapping("/api/v0/customers")
    public List<Customer> fetchCustomersAsList() {
        return customerService.fetchCustomerDataAsList();
    }
}
|
Now we have all our base code setup. Let’s move on to configuring our Database and getting some data inserted.
Setup our Database
Update the application.properties to map our H2 DB
 1
 2
 3
 4
 5
 6
 7
 8
 9
10
|
spring.h2.console.enabled=true
spring.h2.console.settings.web-allow-others=true
spring.datasource.username=sa
spring.datasource.password=
spring.datasource.url=jdbc:h2:mem:testdb
spring.datasource.driverClassName=org.h2.Driver
spring.datasource.initialization-mode=always
spring.datasource.initialize=true
spring.jpa.database-platform=org.hibernate.dialect.H2Dialect
spring.jpa.hibernate.ddl-auto=update
|
Now with our DB setup, we can use the springboot auto configuration to run scripts on our DB when the application is started.
Create a schema.sql file
1
2
3
4
5
6
|
CREATE TABLE customer (
   id INT NOT NULL,
   first_name VARCHAR(100) NOT NULL,
   last_name VARCHAR(100) NOT NULL,
   customer_id VARCHAR(100) NOT NULL
);
|
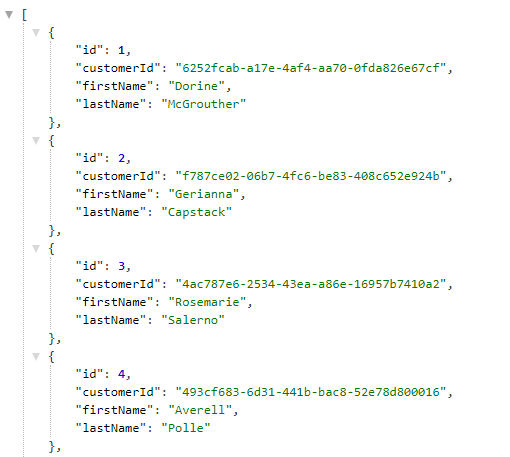
And create a data.sql file
1
2
3
|
insert into customer values(1,'Dorine','McGrouther','6252fcab-a17e-4af4-aa70-0fda826e67cf');
insert into customer values(2,'Gerianna','Capstack','f787ce02-06b7-4fc6-be83-408c652e924b');
insert into customer values(3,'Rosemarie','Salerno','4ac787e6-2534-43ea-a86e-16957b7410a2');
|
The script in the Github repository has around 1000 customers in the file.
Each time the application runs, since we are using a h2 database, it will run the schema.sql script and then the data.sql script which will set up our database environment.
Test our base app
To test it out launch the spring boot application with your IDE and use your browser and enter the URL
http://localhost:8080/api/v0/customers.
If you’ve used the insert script in the repository, you will get 1000 records in this JSON output.
Implementing Filtering
Now let us first implement basic filtering in our code. We will allow the user to filter on 2 fields - firstName and/or lastName. For this we will create a new endpoint and pass in these 2 variables as Request parameters with a default value of ""
Update Repository
Add the below query to our CustomerRepository Interface
1
2
3
4
|
String FILTER_CUSTOMERS_ON_FIRST_NAME_AND_LAST_NAME_QUERY = "select b from Customer b where UPPER(b.firstName) like CONCAT('%',UPPER(?1),'%') and UPPER(b.lastName) like CONCAT('%',UPPER(?2),'%')";

@Query(FILTER_CUSTOMERS_ON_FIRST_NAME_AND_LAST_NAME_QUERY)
List<Customer> findByFirstNameLikeAndLastNameLike(String firstNameFilter, String lastNameFilter);
|
We have written a custom query that will filter based on first name and last name.
Now all we need to do is call it from our service.
Update Service
Add a new method to our service
1
2
3
4
|
public List<Customer> fetchFilteredCustomerDataAsList(String firstNameFilter, String lastNameFilter) {
    // Apply the filter for firstName and lastName
    return customerRepository.findByFirstNameLikeAndLastNameLike(firstNameFilter, lastNameFilter);
}
|
Notice that we are still returning a List<Customer> . It is a filtered list though.
Update Controller
Add a new endpoint that accepts 2 fields as filter conditions
 1
 2
 3
 4
 5
 6
 7
 8
 9
10
|
/**
* @param firstNameFilter Filter for the first Name if required
* @param lastNameFilter  Filter for the last Name if required
* @return List of filtered customers
*/
@GetMapping("/api/v1/customers")
public List<Customer> fetchCustomersAsFilteredList(@RequestParam(defaultValue = "") String firstNameFilter,
                                                    @RequestParam(defaultValue = "") String lastNameFilter) {
    return customerService.fetchFilteredCustomerDataAsList(firstNameFilter, lastNameFilter);
}
|
Test it out
Run the application and this hit the v1 URL which we created
http://localhost:8080/api/v1/customers?firstNameFilter=ur&lastNameFilter=as
Try this out with different filters. Instead of all 1000 customers we will get only the filtered list of customers.
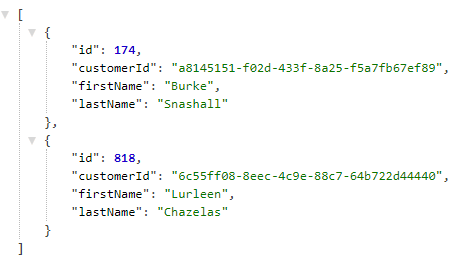
In this case there are only 2 customers with first name containing ‘ur’ and last name containing ‘as’.
Implementing Page with Filtering
Page is a common interface used to fetch data in a page format from our database. Though the format doesnt necessarily contain pertinent information, it still is limited data set and we can apply our filtering logic to it.
Update Repository
Add the below query to our CustomerRepository Interface
1
2
|
@Query(FILTER_CUSTOMERS_ON_FIRST_NAME_AND_LAST_NAME_QUERY)
Page<Customer> findByFirstNameLikeAndLastNameLike(String firstNameFilter, String lastNameFilter, Pageable pageable);
|
The only difference is that we are also passing a pageable object with the filters and returning a Page<Customer> instead of List<Customer>
Update Service
Add a new method to our service
1
2
3
4
5
6
|
public Page<Customer> fetchCustomerDataAsPageWithFiltering(String firstNameFilter, String lastNameFilter, int page, int size) {
    // create Pageable object using the page and size
    Pageable pageable = PageRequest.of(page, size);
    // fetch the page object by additionally passing pageable with the filters
    return customerRepository.findByFirstNameLikeAndLastNameLike(firstNameFilter, lastNameFilter, pageable);
}
|
Here we need 2 additional inputs- page and size. Page indicates which page we want to fetch from the DB. And size referes to the number of objects we want on each page.
Note: Page starts at 0 so be careful.
So if there are 1000 objects and we give a page of 2 and size of 50. We will get the third set of 101-150 objects.
Update Controller
Add a new endpoint that accepts 2 fields as filter conditions and 2 fields for page functionality
 1
 2
 3
 4
 5
 6
 7
 8
 9
10
11
12
13
14
|
/**
* @param firstNameFilter Filter for the first Name if required
* @param lastNameFilter  Filter for the last Name if required
* @param page            number of the page returned
* @param size            number of entries in each page
* @return Page object with customers after filtering
*/
@GetMapping("/api/v2/customers")
public Page<Customer> fetchCustomersWithPageInterface(@RequestParam(defaultValue = "") String firstNameFilter,
                                                        @RequestParam(defaultValue = "") String lastNameFilter,
                                                        @RequestParam(defaultValue = "0") int page,
                                                        @RequestParam(defaultValue = "30") int size) {
    return customerService.fetchCustomerDataAsPageWithFiltering(firstNameFilter, lastNameFilter, page, size);
}
|
Notice that we have kept the default page as 0 and size as 30.
Test it out
Run the application and this hit the v2 URL which we created with additional parameters
http://localhost:8080/api/v2/customers?firstNameFilter=Ar&lastNameFilter=sp&page=0&size=30
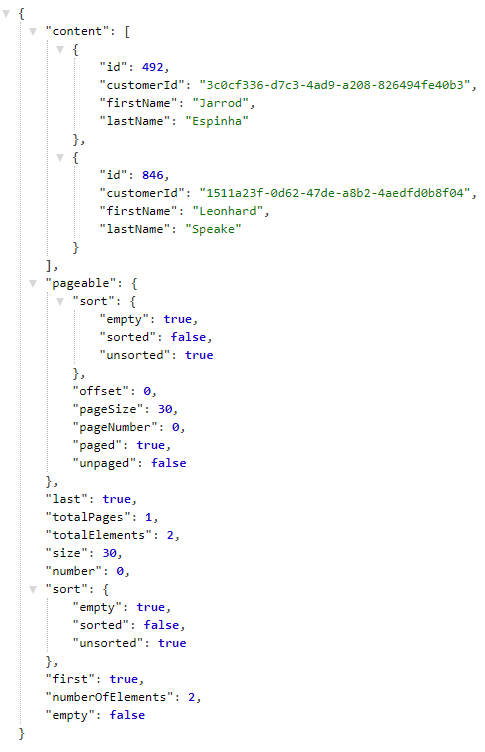
We can see more information being displayed but it doesn’t seem to be too relevant. If required, you could do some custom coding to convert the format.
Implementing Page with Filtering and Sorting
Now we will implement sorting to the above logic.
Update Repository
No update in repository is required. We will reuse the previous method that returns a Page<Customer>
Update Service
Add a new method to our service
 1
 2
 3
 4
 5
 6
 7
 8
 9
10
11
12
13
14
15
16
17
18
19
20
|
public Page<Customer> fetchCustomerDataAsPageWithFilteringAndSorting(String firstNameFilter, String lastNameFilter, int page, int size, List<String> sortList, String sortOrder) {
    // create Pageable object using the page, size and sort details
    Pageable pageable = PageRequest.of(page, size, Sort.by(createSortOrder(sortList, sortOrder)));
    // fetch the page object by additionally passing pageable with the filters
    return customerRepository.findByFirstNameLikeAndLastNameLike(firstNameFilter, lastNameFilter, pageable);
}

private List<Sort.Order> createSortOrder(List<String> sortList, String sortDirection) {
    List<Sort.Order> sorts = new ArrayList<>();
    Sort.Direction direction;
    for (String sort : sortList) {
        if (sortDirection != null) {
            direction = Sort.Direction.fromString(sortDirection);
        } else {
            direction = Sort.Direction.DESC;
        }
        sorts.add(new Sort.Order(direction, sort));
    }
    return sorts;
}
|
We have 2 methods. 1 public method that we will call from our controller which has 2 additional inputs - sortList and sortOrder.
SortList takes in the list of string on which we need to sort it and sortOrder takes either ASC or DESC.
The second private method creates the Sort.Order list object which is used in creating the Page object.
Update Controller
Add a new endpoint that accepts 2 fields as filter conditions, 2 fields for page functionality and 2 for sort functionality
 1
 2
 3
 4
 5
 6
 7
 8
 9
10
11
12
13
14
15
16
17
18
|
/**
* @param firstNameFilter Filter for the first Name if required
* @param lastNameFilter  Filter for the last Name if required
* @param page            number of the page returned
* @param size            number of entries in each page
* @param sortList        list of columns to sort on
* @param sortOrder       sort order. Can be ASC or DESC
* @return Page object with customers after filtering and sorting
*/
@GetMapping("/api/v3/customers")
public Page<Customer> fetchCustomersWithPageInterfaceAndSorted(@RequestParam(defaultValue = "") String firstNameFilter,
                                                                @RequestParam(defaultValue = "") String lastNameFilter,
                                                                @RequestParam(defaultValue = "0") int page,
                                                                @RequestParam(defaultValue = "30") int size,
                                                                @RequestParam(defaultValue = "") List<String> sortList,
                                                                @RequestParam(defaultValue = "DESC") Sort.Direction sortOrder) {
    return customerService.fetchCustomerDataAsPageWithFilteringAndSorting(firstNameFilter, lastNameFilter, page, size, sortList, sortOrder.toString());
}
|
Test it out
Run the application and this hit the v3 URL which we created with additional parameters
http://localhost:8080/api/v3/customers?firstNameFilter=Ria&lastNameFilter=ss&page=0&size=5&sortList=firstName&sortOrder=ASC
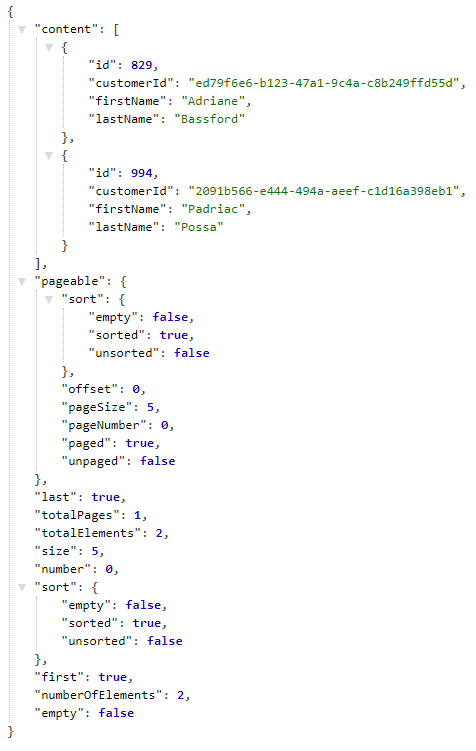
The only advantage here compared to our last version is that we can sort the data now.
Coming to our final step - implementing hateoas with filtering and sorting.
Update Repository
No update in repository is required. We will reuse the already created method returning Page<Customer>
Update Service
No update is required. We will reuse the method returning Page<Customer>
Create files to support Hateoas
Now to use hateoas we convert the page format to a hateoas PagedModel format. To do so we need 2 additional files
- Customer Model (extends RepresentationModel<>)
- Customer Model Assembler(extends RepresentationModelAssemblerSupport<,>)
Create CustomerModel
First off we need to create Customer Model that extends the hateoas RepresentationModel which is part of the body of the response we send. We also create getters and setters for the object variables.
 1
 2
 3
 4
 5
 6
 7
 8
 9
10
11
12
13
14
15
16
17
18
19
20
21
22
23
24
25
26
27
28
29
30
31
32
33
34
35
|
/**
 * The CustomerModel class extends the Hateoas Representation Model and is required if we want to convert the Customer
 * Entity to a pagination format
 */
public class CustomerModel extends RepresentationModel<CustomerModel> {
    private Long id;
    private String customerId;
    private String firstName;
    private String lastName;

    public Long getId() {
        return id;
    }
    public void setId(Long id) {
        this.id = id;
    }
    public String getCustomerId() {
        return customerId;
    }
    public void setCustomerId(String customerId) {
        this.customerId = customerId;
    }
    public String getFirstName() {
        return firstName;
    }
    public void setFirstName(String firstName) {
        this.firstName = firstName;
    }
    public String getLastName() {
        return lastName;
    }
    public void setLastName(String lastName) {
        this.lastName = lastName;
    }
}
|
If we dont want the sequence generated id to be returned we can remove it from this object itself.
Create CustomerModelAssembler
Now we need the assembler which extends RepresentationModelAssemblerSupport and we pass in the from object which is our entity and to object which is our newly created Model. We are forced to override the toModel() method in which we copy the values of the entity to the model.
 1
 2
 3
 4
 5
 6
 7
 8
 9
10
11
12
13
14
15
16
17
18
|
/**
 * This class extends RepresentationModelAssemblerSupport which is required for Pagination.
 * It converts the Customer Entity to the Customer Model and has the code for it
 */
@Component
public class CustomerModelAssembler extends RepresentationModelAssemblerSupport<Customer, CustomerModel> {
    public CustomerModelAssembler() {
        super(CustomerController.class, CustomerModel.class);
    }

    @Override
    public CustomerModel toModel(Customer entity) {
        CustomerModel model = new CustomerModel();
        // Both CustomerModel and Customer have the same property names. So copy the values from the Entity to the Model
        BeanUtils.copyProperties(entity, model);
        return model;
    }
}
|
Update Controller
Autowire 2 components required
1
2
3
4
5
|
@Autowired
private CustomerModelAssembler customerModelAssembler;

@Autowired
private PagedResourcesAssembler<Customer> pagedResourcesAssembler;
|
and add a new endpoint that will call the Page
 1
 2
 3
 4
 5
 6
 7
 8
 9
10
11
12
13
14
15
16
17
18
19
20
21
|
/**
* @param firstNameFilter Filter for the first Name if required
* @param lastNameFilter  Filter for the last Name if required
* @param page            number of the page returned
* @param size            number of entries in each page
* @param sortList        list of columns to sort on
* @param sortOrder       sort order. Can be ASC or DESC
* @return PagedModel object in Hateoas with customers after filtering and sorting
*/
@GetMapping("/api/v4/customers")
public PagedModel<CustomerModel> fetchCustomersWithPagination(
        @RequestParam(defaultValue = "") String firstNameFilter,
        @RequestParam(defaultValue = "") String lastNameFilter,
        @RequestParam(defaultValue = "0") int page,
        @RequestParam(defaultValue = "30") int size,
        @RequestParam(defaultValue = "") List<String> sortList,
        @RequestParam(defaultValue = "DESC") Sort.Direction sortOrder) {
    Page<Customer> customerPage = customerService.fetchCustomerDataAsPageWithFilteringAndSorting(firstNameFilter, lastNameFilter, page, size, sortList, sortOrder.toString());
    // Use the pagedResourcesAssembler and customerModelAssembler to convert data to PagedModel format
    return pagedResourcesAssembler.toModel(customerPage, customerModelAssembler);
}
|
Notice how we are using the autowired components. Using the assembler we are converting the Page<Customer> to PagedModel<Customer> by calling the toModel() method
Test it out
Run the application and this hit the v4 URL which we created with additional parameters
http://localhost:8080/api/v4/customers?firstNameFilter=R&lastNameFilter=S&page=0&size=4&sortList=firstName&sortOrder=ASC
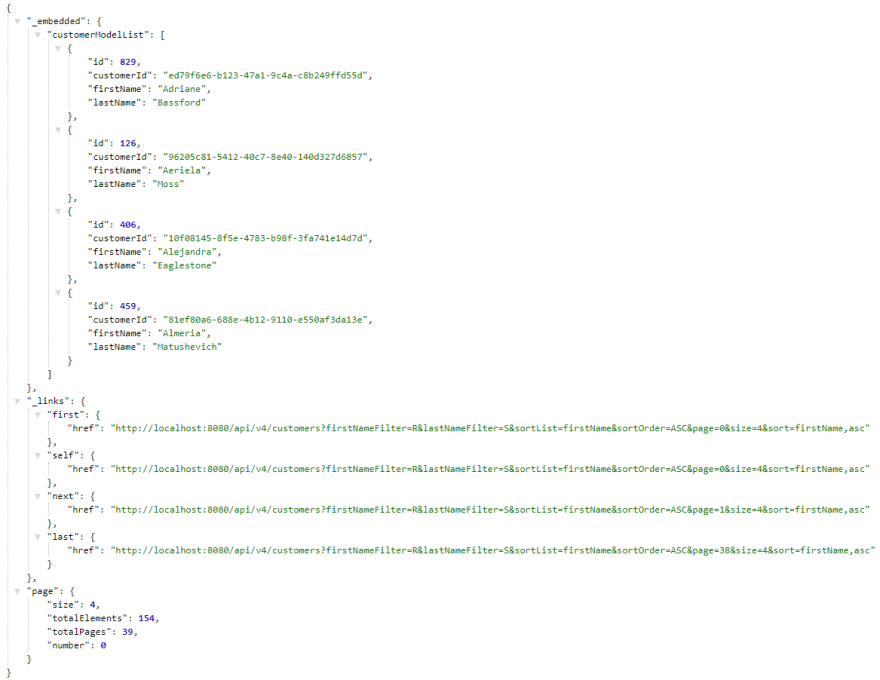
Taking a closer look at our output we notice some really beneficial information.
- “_links” - this key contains an object with links to the first,self,next and last page. These links can be used from the frontend team to use pagination in the UI.
- “page” - this tells us how many elements, totaly elements after filtering and sorting, total pages and current page number.
- “_embedded” - contains the list of CustomerModels. The actual data that is converted from the entity to the model.
Conclusion
I spent a lot of time figuring this out when i needed to implement it at a work project and I hope this helps someone out there needing to do the same.
Check out the Github link and play around with it and see if it works in your project as well.
https://github.com/markbdsouza/hateoas-with-pagination
Feel free to leave a comment, if you have any questions or need any help.
Reference https://dev.to/markbdsouza/paginationwith-hateoas-filtering-sorting-with-spring-boot-and-jpa-1mpp