We sometimes encounter a variety of application servers to deploy in our projects due to the different customers we work with. Although Spring Boot has a built-in Embedded Tomcat server, this is mainly used for development or microservice deployment. If you end up deploying your application to a client’s Tomcat / JBoss EAP / IBM WebSphere environment, you still need to make some adjustments. Today’s article is an in-depth look at the setup process and complete knowledge of deploying to Apache Tomcat®.

Create sample applications
-
Quickly building a project using the Spring Boot CLI
1spring init --dependencies=web --groupId=com.duotify app1It can also be built with Spring Initializr.
Open the project using Visual Studio Code.
1code app1 -
Add a HomeController controller
File path:
src/main/java/com/duotify/app1/controllers/HomeController.java.1 2 3 4 5 6 7 8 9 10 11 12 13package com.duotify.app1.controllers; import org.springframework.web.bind.annotation.GetMapping; import org.springframework.web.bind.annotation.RestController; @RestController public class HomeController { @GetMapping("/") public String home() { return "Hello World"; } } -
Test
1mvn spring-boot:runAddendum: You can add a
<defaultGoal>spring-boot:run</defaultGoal>setting under the<build>node inpom.xml, then you can just typemvnand Spring Boot will start running automatically! 👍1curl http://localhost:8080/
Adjust the project
To deploy to a standalone Tomcat server, the following adjustments must be made in a total of only 3 steps.
-
Modify the
@SpringApplicationstartup classThe main class, originally annotated with
@SpringBootApplication, must be modified to inherit from theSpringBootServletInitializerclass.1 2 3 4 5 6 7 8 9 10 11 12 13 14package com.duotify.app1; import org.springframework.boot.SpringApplication; import org.springframework.boot.autoconfigure.SpringBootApplication; import org.springframework.boot.web.servlet.support.SpringBootServletInitializer; @SpringBootApplication public class DemoApplication extends SpringBootServletInitializer { public static void main(String[] args) { SpringApplication.run(DemoApplication.class, args); } }In fact,
SpringBootServletInitializerimplements theWebApplicationInitializerinterface, which is new in Servlet 3.0+ (JSR 315), and the implementation of this interface will automatically set the The implementation of this interface automatically configures the ServletContext and communicates with the Servlet Container, allowing the application to mount smoothly to any Application Server that supports the Servlet Container.This mechanism is only supported from Servlet 3.0 API onwards, while Apache Tomcat supports Servlet 3.0 specification from version
7.0onwards. If you are using Servlet2.5or earlier, you still need to registerApplicationContextandDispatcherServletthroughweb.xml. However, Apache Tomcat 7.0 is a deprecated version, so it should not be easy to encounter. For more information, see Apache Tomcat® - Which Version Do I Want? -
Adjust
pom.xmland change Packaging format towar1<packaging>war</packaging> -
Adjust
pom.xmland addspring-boot-starter-tomcatdependencies and set<scope>toprovided.
The following is the current pom.xml file content.
|
|
Starting Tomcat Application Server
The following are the steps to start the Tomcat Application Server locally.
-
First download the 64-bit Windows zip archive from Apache Tomcat 9 Software Downloads
1apache-tomcat-9.0.65-windows-x64.zip -
Unzip to any folder
Suppose we extract the zip to the
G:\apache-tomcat-9.0.65folder. -
Starting Tomcat Server
1G:\apache-tomcat-9.0.65\bin\catalina.bat runBy default, it will listen to port 8080.
Export the package file and deploy it to the Tomcat application server
Finally, we have to export a *.war file that can be deployed to Tomcat, basically the deployment steps are as follows.
-
Run the
mvn clean packagecommandThis command generates the
target/app1-0.0.1-SNAPSHOT.warfile, which is about 17MB in size.You can unzip this war file to see its directory structure.
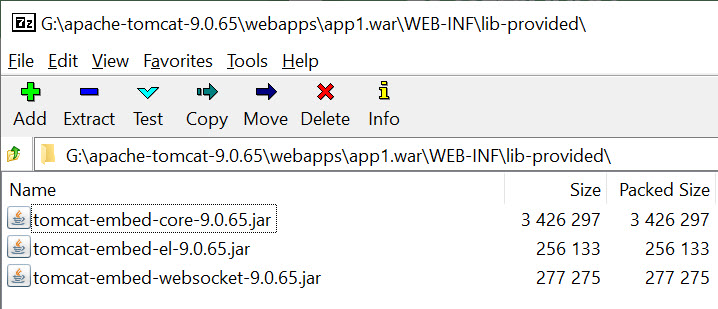
The most noteworthy point here is the
WEB-INF/lib-providedfolder. Since we have changed the<scope>of the spring-boot-starter-tomcat dependent package inpom.xmlto provided, this package is moved from the default to WEB-INF/lib to theWEB-INF/lib-providedfolder, which means that when we deploy to Tomcat This means that the*.jarfile in theWEB-INF/lib-providedfolder will not be loaded by default when we deploy to the Tomcat application server. -
Copy the
target/app1-0.0.1-SNAPSHOT.warfile to theG:\apache-tomcat-9.0.65\webappsdirectory.Wait about 1 to 3 seconds, Tomcat will automatically deploy the
app1-0.0.1-SNAPSHOT.warfile and automatically extract it to theapp1-0.0.1-SNAPSHOTdirectory.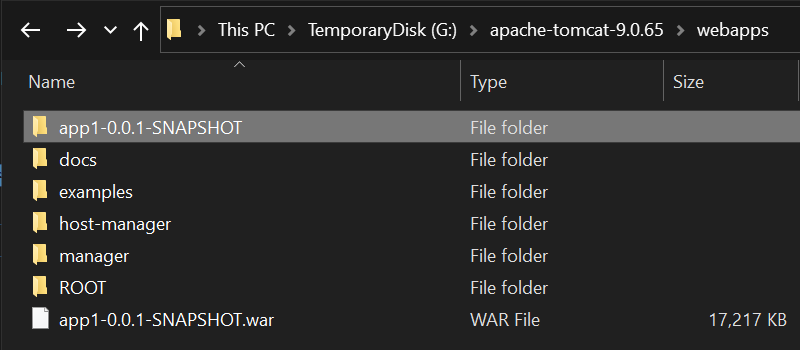
And we can also see the following message from the Console screen of running Tomcat.
1 2 3 4 5 6 7 8 9 10 11 12 13 14 15 1619-Sep-2022 22:43:23.587 INFO [Catalina-utility-2] org.apache.catalina.startup.HostConfig.deployWAR Deploying web application archive [G:\apache-tomcat-9.0.65\webapps\app1-0.0.1-SNAPSHOT.war] 19-Sep-2022 22:43:25.458 INFO [Catalina-utility-2] org.apache.jasper.servlet.TldScanner.scanJars At least one JAR was scanned for TLDs yet contained no TLDs. Enable debug logging for this logger for a complete list of JARs that were scanned but no TLDs were found in them. Skipping unneeded JARs during scanning can improve startup time and JSP compilation time. . ____ _ __ _ _ /\\ / ___'_ __ _ _(_)_ __ __ _ \ \ \ \ ( ( )\___ | '_ | '_| | '_ \/ _` | \ \ \ \ \\/ ___)| |_)| | | | | || (_| | ) ) ) ) ' |____| .__|_| |_|_| |_\__, | / / / / =========|_|==============|___/=/_/_/_/ :: Spring Boot :: (v2.7.3) 2022-09-19 22:43:26.340 INFO 10776 --- [alina-utility-2] com.duotify.app1.DemoApplication : Starting DemoApplication v0.0.1-SNAPSHOT using Java 17.0.2 on WILLSUPERPC with PID 10776 (G:\apache-tomcat-9.0.65\webapps\app1-0.0.1-SNAPSHOT\WEB-INF\classes started by wakau in G:\apache-tomcat-9.0.65) 2022-09-19 22:43:26.345 INFO 10776 --- [alina-utility-2] com.duotify.app1.DemoApplication : No active profile set, falling back to 1 default profile: "default" 2022-09-19 22:43:27.284 INFO 10776 --- [alina-utility-2] w.s.c.ServletWebServerApplicationContext : Root WebApplicationContext: initialization completed in 898 ms 2022-09-19 22:43:28.411 INFO 10776 --- [alina-utility-2] com.duotify.app1.DemoApplication : Started DemoApplication in 2.653 seconds (JVM running for 126.74) 19-Sep-2022 22:43:28.433 INFO [Catalina-utility-2] org.apache.catalina.startup.HostConfig.deployWAR Deployment of web application archive [G:\apache-tomcat-9.0.65\webapps\app1-0.0.1-SNAPSHOT.war] has finished in [4,845] msAt this point, open your browser and visit
http://localhost:8080/app1-0.0.1-SNAPSHOT/to see the application successfully deployed!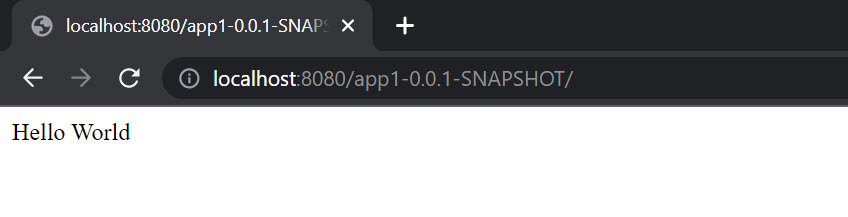
-
Modify the Context Path of the application deployed to Tomcat
Since the default WAR file name will automatically become Tomcat’s Context Path when deploying
app1-0.0.1-SNAPSHOT.warto Tomcat, we can adjust the<build><finalName>setting inpom.xmlto specify the final output file name. We can use${project.artifactId}, a built-in Maven attribute, to get theartifactIdof the project as the file name.Run
mvn clean packageagain and thetarget/app1.warfile will be output! 👍Addendum: If you want to specify the Context Path during the development testing phase, you can add a
server.servlet.context-path=/app1property tosrc/main/resources/application.properties. See: Spring Boot Change Context Path.
Technical details about the provided scope in Maven dependency management
There is one more devilish detail that I discovered when we packaged this Spring Boot application.
I originally thought that as long as the dependent package was set to <scope>provided</scope>, it would only be used during compile and test, but not actually loaded during runtime. So if it won’t be loaded, shouldn’t it theoretically be excluded from the final package *.war file, so that the overall file size of *.war can be reduced and deployed more quickly?
I found that the size of the overall *.war file does not decrease at all, and all Tomcat Embedded related files are still packed in.
I also found that the app1.war file can not only be deployed to the Tomcat application server, but it can also be run independently via java -jar app1.war. In fact, it is quite convenient to think about this design, you can run it locally at any time and deploy it remotely at the same time, but the only drawback is that the file is relatively large.
I’ve spent a lot of time trying to automatically exclude Tomcat Embedded related files through the Maven build process. Then I found a way to “skip the spring-boot-maven-plugin plugin to execute the repackage target”. You just need to adjust the spring-boot-maven-plugin plugin settings.
|
|
If you want to switch the settings automatically via Spring Profiles, the complete settings are as follows.
|
|
From now on, you can run different commands and generate different WAR files based on different profiles.
-
To build the WAR file for the test environment, you can execute the following command.
1mvn clean packageThe output of
app1.waris about 17MB in size -
To build a WAR file for the production environment, you can run the following command.
1mvn clean package -PprodThe output of
app1.waris about 12MB in size
Related links
- Example program for this article: https://github.com/doggy8088/spring-boot-deploy-tomcat-demo
- Apache Tomcat® - Welcome!
- Stack Overflow
- Baeldung
- Apache Maven
- YouTube
Reference https://blog.miniasp.com/post/2022/09/21/How-to-deploy-Spring-Boot-to-Apache-Tomcat